Uploading and Downloading Data
Uploading Compressed Package Files
Requesting and Using Digital Object Identifiers
To contribute data to the DRP users should Sign up in the portal by selecting a username and a unique password. During sign-up, we collect information that will allow linking to other services in future, and also speeds up issuing DOI for projects when publishing. The fields required are as follows:
Once they are logged in, they will access the My Projects interface through which they can create and manage one or multiple projects, each of which may involve a simple or complex dataset and different collaborators. Through this interface users can add collaborators, enter and edit metadata, and upload their data.
Please email us if you intend to upload data larger than 1GB. We advise users to splitt larger datasets into 1GB chunks prior to upload so that users interested in reusing the data can easily download//manipulate on their personal computers.
It is advised that before uploading data to the DRP users think about the structure of their research and use an available file system or the cloud (Dropbox or UT Box) to organize their data in the corresponding classes.
A note on data ownership and future citations of published projects. It is best if the person who is the data author (and will be the first author in the data citation once the project is published) is also the project owner on DRP. Project owner can add collaborators (see below) that can edit the project and add the data. We understand that the data owners (say, principal investigator in a larger research group) is not always the person uploading the file. If that is the case, then the data owner should register, create a project under desired name and add the data uploader (who also registered) as a collaborator. This only takes a few moments. After that the data uploader can add and organize data. Once happy with the project data layout, you can request publication (DOI) with a click of a button. At that step you can add authors (whether they are registered users on DRP or not) the way you wish them to appear on the future data citations.
While users upload and get datasets ready for publication, they may need to get help from or to share their data with other team members. Collaborators can be added to projects as long as they are registered in the DRP. For ease of access, collaborations belonging to each user are visible in the navigation bar to the right of the My Projects interface.
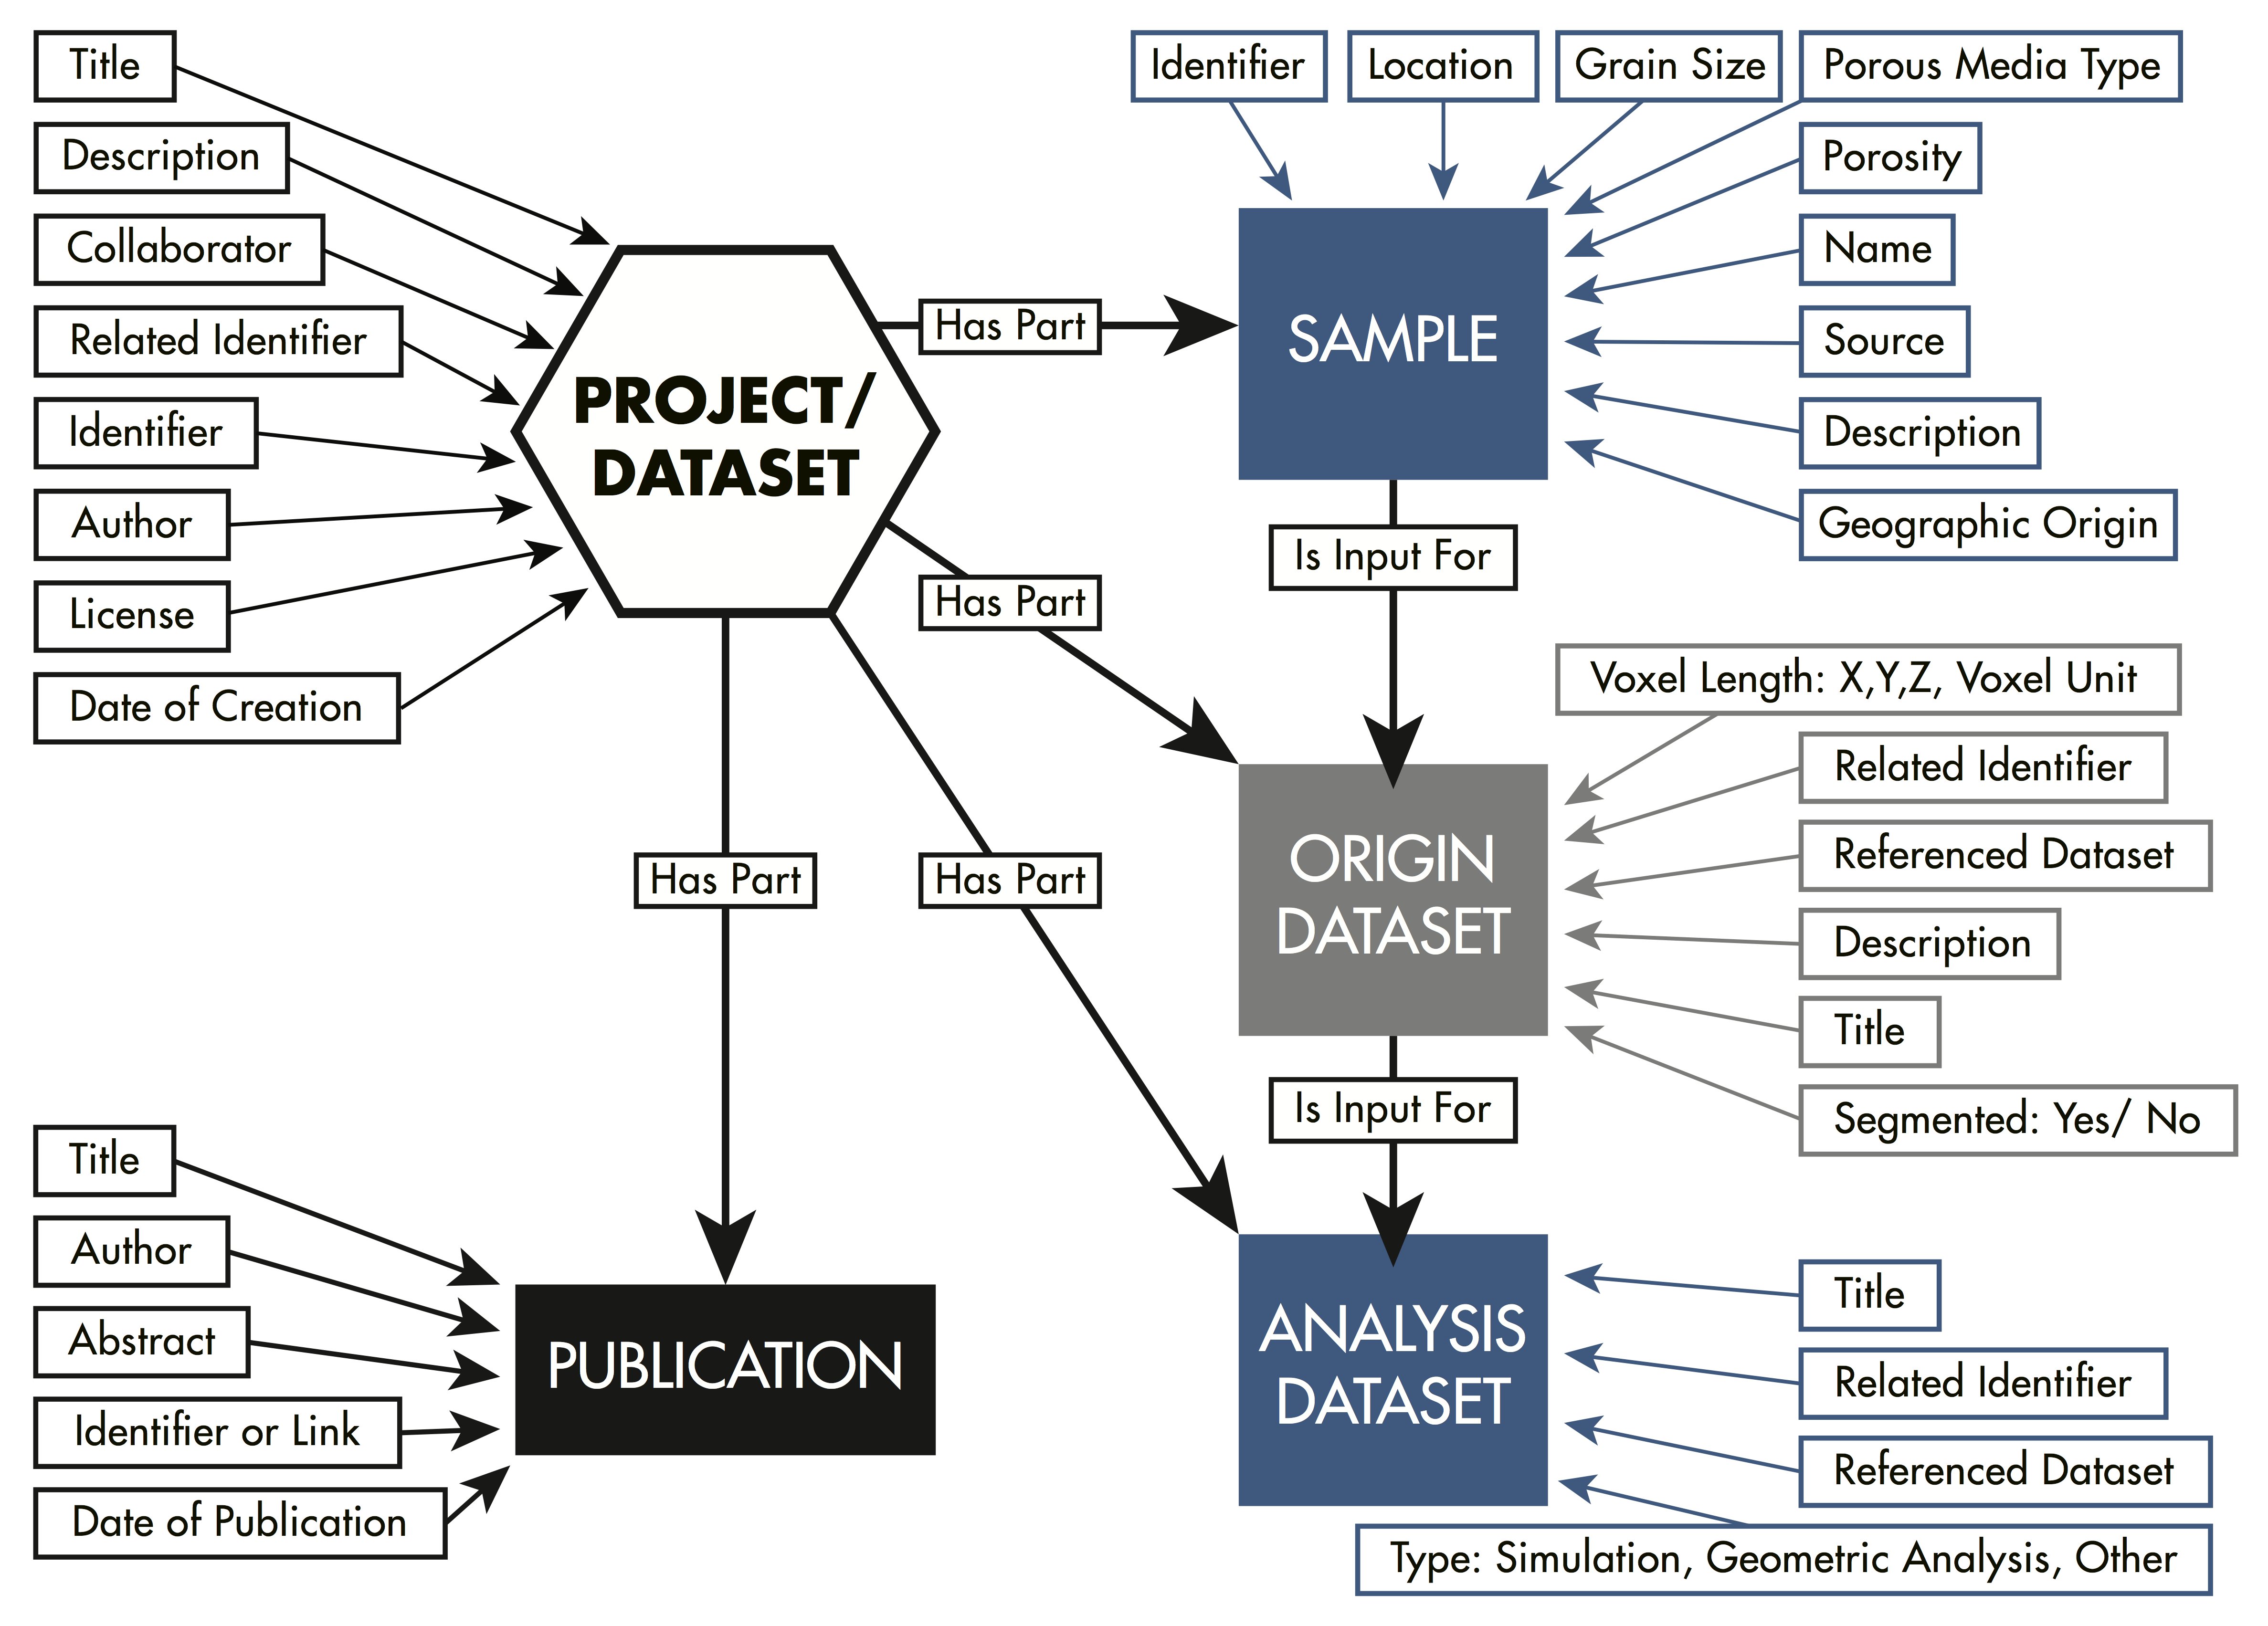
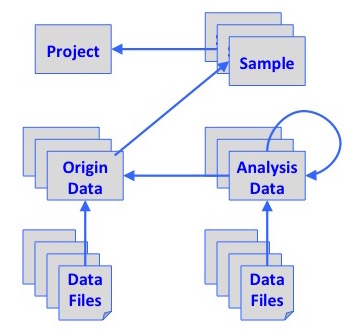
In the DRP users can organize their data in relation to the structure of their research project to distinguish: originating data, and the analysis data resultant from their experiments and or simulations (see Figure). In this way, users may upload a complete dataset including originating and analysis data, or just the images belonging to subsequent analysis.
Data in DRP is organized and published as research projects. We dinstinguish originating data, and the analysis data resultant from their experiments and or simulations. We also can store information on the physical sample the imaged data relates to (see Figure below).
Users can:
- enter data and metadata in any order during the lifecycle of their research process
- view how their projects progress during data upload
- view and create relationships between data and metadata, thus modeling how imaging data is obtained during experiments and/or simulations
As users upload data, they will have to describe it. The description of the data is called metadata. Metadata is useful for purposes of discovering and accessing the data, to understand how it originated and what research it is representing, and to share data with other people and systems such as for automatic collection of references. In this portal, metadata is also used to properly translate images. Thus, at the point of upload, users will be asked to place relevant information that will allow rendering the images correctly.
Because currently there is not a standard available for describing porous imaging data, Dr. Masa Prodanovic identified the information elements needed to describe the datasets and render the image types that are used in the domain. For basic author and data description we use the DataCite metadata schema, which is widely used in the scientific community for purposes of citing data in conjunction with a Digital Object Identifier (DOI). We welcome suggestions on missing but helpful information that should included with every dataset.
The better you can describe your data, the better your research will be represented and reused. The DRP enforces a minimum metadata in order to achieve a decent description of the dataset. As you go thrugh the process of describing your data, you will get warnings if that minimum has not been met. More metadata can be added or edited later. However, once the project is public, you will not be able to edit metadata unless you communicate with and send updates to the portal's data curator. Also, you can add notes, help me files or any other information that you deem useful to a user that wants to reuse and cite your data.
For convenience and fast upload users have three options for uploading data: Dropbox, UTBox and drag-and-drop functions. If data is not in standard format, users will be prompted to enter required metadata fields that deem the images renderable -voxel sizes, number of slices and byte order. When the user downloads data, the package includes a metadata file that describes it. To ease image viewing and reuse we implemented services that allow rendering raw images without the user having to download them and read them on their desktop.
Volumetric images. Images uploaded as volumetric raw binary files will be uploaded with the aid of ImageJ on a remote machine. Users fill a form with information that allows the software to correctly read the data (not that raw binary files are the ones without a format that would store such information, and thus it has to be provided by the user). Users have to be aware that when selecting Byte Order, their images may be in Big Endian or Little Endian, so when unknown, they should try both options to check the correct one. (For 8-bit data, byte order can be either of the options). Users can always try to read their images in ImageJ locally before uploading to the portal in order to test all input parameters, or keep checking different options on the portal.
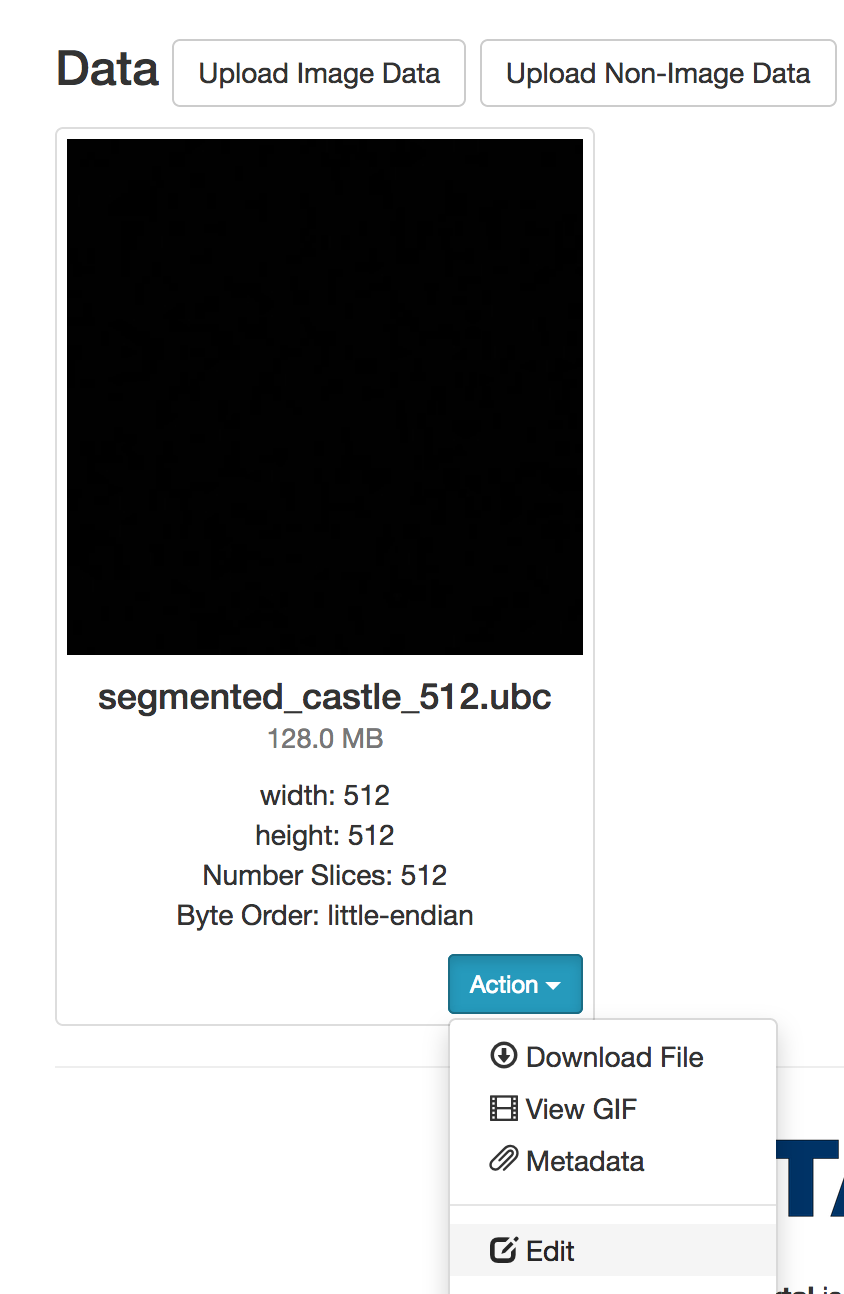
Volumetric images that have a small range of values (say 0,1 and 2) will not initially display correctly (the maximum value is for 8-bit images is 255, thus small values will render black). For instance you might get someything like this:
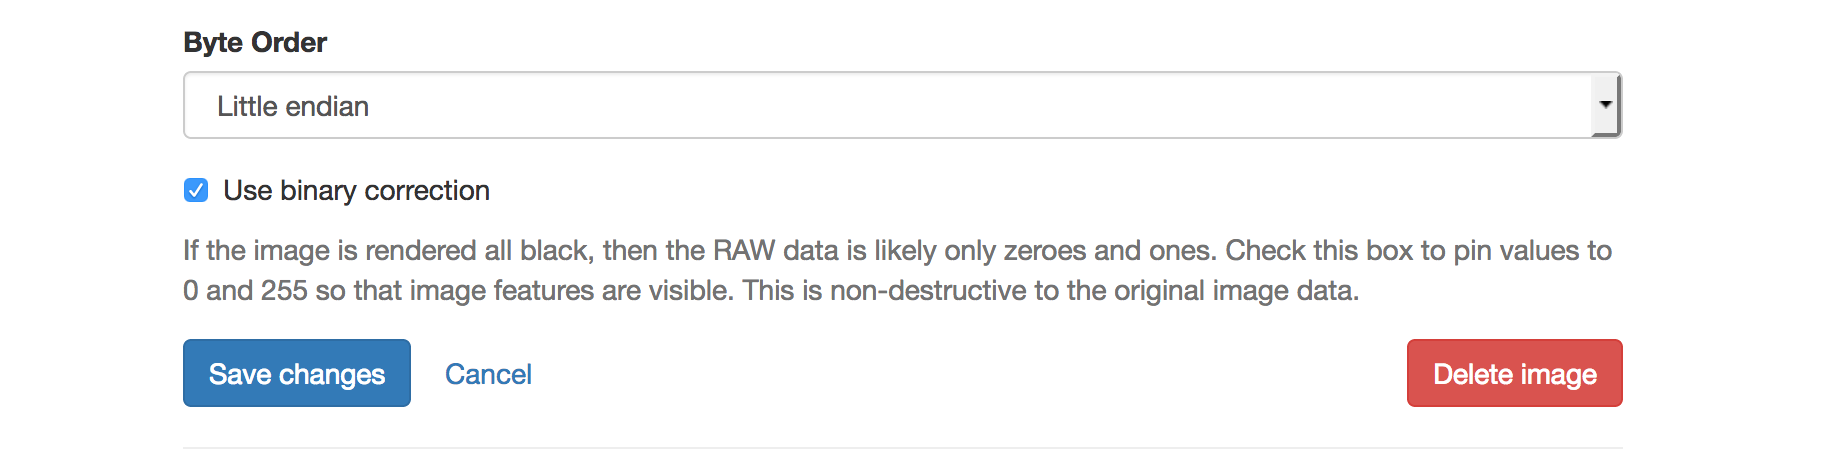
In order to correct the problem, in your Project, go to the image, Click on Actions tab and select Edit. Then find "Use binary correction" option at the very end, select it and click Save Changes tab:
Voxel length is the length in physical units (in one of the directions) of the smallest image unit (numerical cell, voxel). Voxel refers to a three dimensional object, and pixel is two dimensional. If you do not know the voxel length or it is not applicable for synthetic images, enter it as 1 and provide a comment that it has no physical meaning.
The number of voxels is the number of cells that comprise the image in each direction, and thus is the length normalized by voxel length.
Directions (x,y,z) refers to as 'width', 'length' and 'number of images (in a stack)'
At this time the portal only identifies image file types. We are working on identifying all common file types used in research (ascii, netcdf, pdf, excel, xml, etc.).
In general it is not recommended to compress files for upload since no preview (GIF movie of the voluemtric stack) or analysis (such as histogram) will be available for such data. We offer different fast upload and download possibilities through Dropbox and UTbox so that users can transfer many files in bulk at ease. A user may select files for upload and download and leave the system to work on it without fear of interrupting data transfer. Entering unpacked data in the portal allows for describing and rendering image files (in the future other types of files) which allows other users to view the files within the portal for ease of browsing and selection for download.
At the DRP users may store, organize and describe their data privately until they are ready to share it publicly. This enables users to store their data gradually as their research progresses, and to edit metadata or add documentation at the natural pace of their research project. DRP constitutes a secure repository to store data during research.
The private option is useful to keep objects out of the public view during an embargo period. Embargo periods are used while the first publication related to a dataset is being prepared or released, while data is being reviewed and organized, or while the author is filing a patent related to the data. However, because the DRP is an open repository, objects cannot be on embargo for long periods of time. We have set up a limit of two years. After that limit, you will receive an email suggesting that the data be made public or that you either remove your items from the repository or pay a user fee for storage. The User Agreement provides more information about the fee schedule.
Once the data is published it cannot be changed, updated, increased or deleted. If changes are absolutely necessary, please contact the portal's data curator to request that the changes be made. If users need to publish a dataset derived from an existing one, it will become a different (related) dataset with its own DOI. The portal offers the possibility to fork data from projects within so that there is no need to upload and describe them again.
The data in this portal is hosted in Corral, a high performance storage resource that is maintained at the Texas Advanced Computing Center and supported by the University of Texas System Research Cyberinfrastructure Initiative (UTRC). In Corral, the data is geographically replicated to prevent any data loss. Corral is monitored 24/7 and periodically updated.
The DRP is an open data repository and licensing your data lets others know under what conditions others can reuse your. We offer the option to select the Open Data Commons Attribution License (ODC-By) which indicates to the users that they can freely share, modify and use the data provided that they cite the authors.
A DOI is a type of persistent identifier that will be managed over time, allowing the digital object to be persistently referenced, as the identifier will not change even if the item is moved or renamed. DOIs are useful to link data to a publication.In this portal you can choose to request DOIs for the dataset or for individual objects. When making such choice, think abut what you would like others to reference in relation to a publication (e.g. the complete dataset or individual objects).
If your project involves data that has been published elsewhere and or has an existing DOI, users have the opportunity to reference those datasets using the External URL box. The DOI and/or a link can be input there.
At this moment the process of obtaining a DOI is manual through the portal's data curator. Once you decide to make your data public by selecting the public data button, the data curator will get in touch with you with the DOI. If you have further doubts about the process, you may email mary.pettengill@engr.utexas.edu
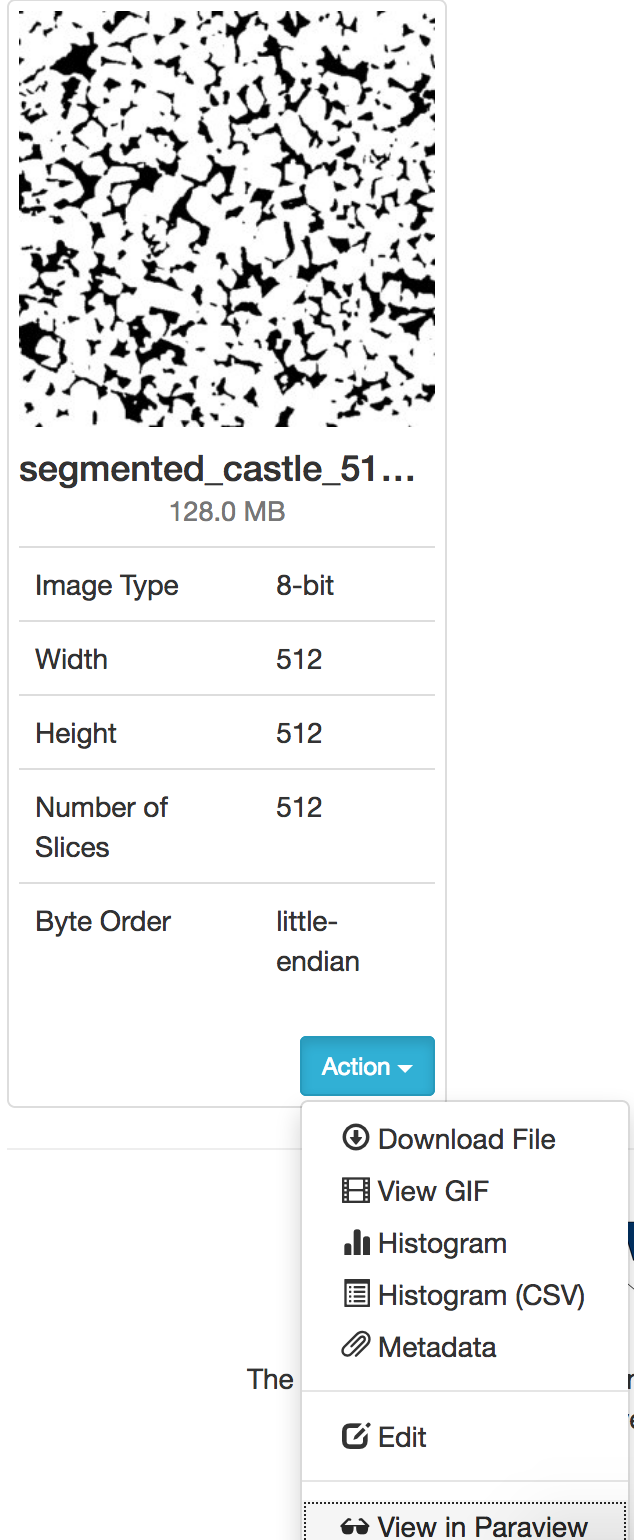
Remote Visualization on Stampede cluster in Texas Advanced Computing Center is now available for volumetric images on the portal: please click on "Actions" tab and select "View in Paraview". See this screen shot for example:
The service connects to a "community" (shared) user account on Maverick, makes the volumetric file available on it and opens visualization software Paraview. We assume that the user knows the basics of Paraview.
In order to open a raw binary image, you will need the information on data type, byte order, and size of the volume in each direction (width, height, number of slices). This information is available under the image rendered with the data (see screen shot above).
For short tutorials on how to use remote visualization, or how to use Paraview with data downloaded with the portal, see the following Youtube channel.
Any work (images, files) you save from the remote Paraview session will show up in "Scratch space" tab on your DRP account.
The account (and the time on the visualization cluster) is shared - please be mindful of that, and let us know if you run into any issues.
The following figure depicts our data model. This is something that can be useful if attempting to link Digital Rocks Portal to a different portal. Let us know if we can provide more information.